TL;DR: AWS Cognito offers robust handling of user Authentication flows, including via Social Providers such as Google and Facebook. Here we describe a Higher Order Component for your ReactJS Web App, and how to configure Cognito.
Introduction
The problem of User Authentication is a very common one across apps and platforms. There is little standardization, and for various reasons you often end up writing a lot of new code for each new app, handling features you’ve already built a dozen times in the past. If it’s not your team’s main focus, it can be difficult to keep up with best practices in the competing concerns of security and usability.
Amazon Web Services (AWS) offers Cognito as a solution for Web and Mobile apps, and it has pretty robust features to handle your Authentication needs. Alas, the documentation leaves much to be desired. Hopefully the example described here will help to clarify some aspects of it. We will use Cognito to provide Authentication services to a ReactJS Web application, via a simple Higher Order Component. You can use any backend that is secured through AWS JWT Tokens (e.g., API Gateway, etc.). When a user logs in, Tokens will be provided to the client using our configured storage mechanism (in-memory, localStorage, or IndexedDB). After that, cognito-hoc handles all authentication flows using AWS Cognito and AWS Amplify, and the app need only concern itself with the user’s login state.
Audience
This article is targeted at those who are considering Cognito as a possible Authentication approach for a small- to medium-sized ReactJS web app. Presumably your backend is a RESTful API which is easily secured using OIDC or OAuth2 Tokens (Cognito provides both).
To follow along with the tutorial, the reader should be familiar with ReactJS. The cognito-hoc package contains a React HOC as its main component.
The reader must also have an AWS Account with full permissions for Cognito, and command-line access to that account, as we will be creating a User Pool and examining and modifying some of the available features.
We will also use AWS Amplify heavily, both the Command-line Interface (CLI) and the JavaScript SDK. It is not necessary to have any prior experience with Amplify; we will cover all that we need in appropriate detail, because this is an essential part of our app as well as our development ecosystem.
What is AWS Cognito?
(If you already know what Cognito is, skip to the next section.)
Per the AWS website, “Amazon Cognito provides authentication, authorization, and user management for your web and mobile apps.” Cognito is a pretty neat tool (or set of tools) if you want to insource the Authentication experience, so long as you are ok with Token-based Authentication. If your backend is an API that you can secure with Tokens (as is, for instance, AWS API Gateway), then Cognito provides a cheap, scalable, secure, and relatively easy-to-use approach. Cognito has continued to improve over time, and you can now configure it in many different ways. As of this writing (mid-2019) it is still not part of AWS’ Enterprise SSO solution (use AWS SSO, which is based on Microsoft AD). But it’s on the roadmap for integration, so by the time you read this Cognito User Pools might be a viable backend for AWS SSO. For now, use Cognito for securing Web and Mobile apps.
For that, Cognito handles all of your Authentication flows, whether natively through Cognito or via the Social Providers Google, Facebook, or Amazon. Integration with other SAML and OAuth2 providers is also possible, though beyond the scope of this tutorial. Cognito lets your users Sign Up, Sign In, Reset their Password, etc., and provides Tokens back to the Client upon Sign In. Cognito understands OAuth and OpenID, so if you are familiar with those you will have less trouble understanding how to setup Cognito.
Cognito stores users in a “User Pool,” including shadow users for Social Providers (for instance if you Sign In with Google, Cognito will automatically place a User record, connected to that Google Id, into the User Pool). You can configure Cognito to use the Secure Remote Password (SRP) protocol, where the user’s password never leaves the client, and other flows as well (we will use SRP in our tutorial). Cognito provides a pre-built, AWS-hosted UI, which is somewhat customizable, though it may or may not be enough for your needs. When a user is Authenticated, assuming you use OAuth2 Authorization Code Grant (as we will) Cognito drops an Id Token, an Access Token, and a Refresh Token into your browser storage. You then use these Tokens to provide access to your backend API, or to AWS services that you want to provide to your users. The Id and Access Tokens are valid for 1 hour, and Cognito, or really Amplify, automatically refreshes them using the Refresh Token, for your specified time period, such as 30 days which is the default. It works somewhat similarly on iOS and Android though we won’t cover those here.
The major concepts in Cognito are the User Pool and the Identity Pool (the Identity Pool is the original concept; User Pools were added later). Because of shortcomings in the documentation one can struggle for a long time to understand the difference between these two, and what to use, when. For our tutorial, we do not use the Identity Pool at all. The User Pool is our Identity Provider, and the benefit of that is simplicity. All of our Authentication, including Federation to the Social Providers Google and Facebook, flows through the User Pool, despite the sometimes confusing terminology and nomenclature in the AWS documentation and examples. As a general rule, an Identity Pool is only needed when you are providing access to AWS services in an AWS account. In our case, we just want a place to store our Users, and a way to authenticate them when needed.
To get the full benefit of Cognito and Amplify, we will use the Cognito Hosted UI (HUI). This is a web property that AWS hosts for you, and it comes built-in with Cognito. It presents the actual User Interface for any of the Authentication flow activities that need it. Because the look of this UI is only somewhat customizable (i.e., for your branding), you may prefer to bypass it in favor of your own custom UI. This is entirely doable, but it may be best to work through our tutorial first. If you decide not to use the HUI, there are many Authentication flows which are no longer fully automated for you, and re-implementing them is beyond the scope of this tutorial. In our tutorial we will review some of the tradeoffs of the HUI, as well as how to customize it.
Since we are focused on ReactJS, it’s worth noting that if you use the HUI, technically you are not exactly deploying an SPA anymore. The HUI has its own page. You can configure it with your own domain if you have a certificate provisioned by AWS Certificate Manager, but there will still be a page refresh or two in the flow even if your user doesn’t use a Social Provider.
What is AWS Amplify?
(If you already know what Amplify is, or if you just are in a hurry, you can safely skip to the next section.)
Amplify is an umbrella product name for several related tools (on Mobile as well as Web) intended to provide “the foundation for your cloud-powered mobile & web apps” (per the Amplify home page). It is designed to get you up and running with a backend hosted on various AWS services, not limited to Cognito. There is an Amplify Console, a CLI (Windows/Linux/Mac), and APIs for JavaScript, iOS, and Android.
Amplify supersedes the older AWS technologies you may have been using, but unfortunately there isn’t good documentation on what exactly is new, and what it supersedes. Suffice to say if you were using the old JavaScript SDK, you should switch to Amplify where possible (and ignore any documentation regarding the old API, though sadly it is sometimes hard to find corresponding documentation on “the Amplify way to do it.”)
Among several documentation shortcomings, Amplify doesn’t use the native terminology for any of its services. So for instance, Cognito is called “Auth” in Amplify, S3 is called “Storage,” etc. In fairness this does make some sense considering that Amplify is presenting capabilities to Mobile and Web Developers, and that sometimes these capabilities combine multiple AWS services (for instance, “Analytics” is a combination of Pinpoint and Kinesis). But there’s no denying, the quality of AWS’ documentation is a significant issue.
When you use the Amplify toolchain (for instance, the CLI), it will generate two work products. The first is an appropriate config file for your client-side SDK. The second is the backend setup in your AWS account. You use the CLI to produce and manage your Amplify configuration (which includes your client-side config file, plus any other info that Amplify collects in order to build your backend), and then you “push” this configuration to your AWS account. At that point, AWS spins up whatever CloudFormation stacks it needs to satisfy your configuration, and runs it. Depending on what you are doing this can get complex, and there is little transparency on what is happening in your AWS account, especially as regards potential costs. After it is done, Amplify will leave the CloudFormation stack(s) in your account, which is good in the sense that you can review them. Don’t directly edit any of your backend though without going through the Amplify CLI. If you get them out of sync, it is not possible to sync them back up. Only do this when you are ready to permanently take over the backend configuration yourself.
Be aware also that Amplify “push” will create IAM objects as needed, though these are quite locked-down and secure.
Amplify is a very capable tool, but the weak, disorganized documentation makes it difficult to use in continuous integration (CI). Probably it belongs more in the prototyping phase or early stages of a project. When you’ve got things set up the way you want them, take over the maintenance of your own AWS backend using the usual tools, moving away from the Amplify CLI, and manually manage your client-side config going forward. This is the approach that we take in this tutorial.
Client-side Token Storage
(If you already understand how Cognito Tokens use localStorage, you might skip to the next section, or check out our alternate storage classes at cognito-auth-storage)
We mentioned above that, for a web app, Cognito stores its tokens in “browser storage.” By default, Cognito uses the browser’s localStorage. This allows for persistence across sessions, so for instance, if a user logs in today, then leaves the app and comes back tomorrow, he or she is still logged in. While this is not always desirable (as may be with a banking app), for many apps this behavior is preferable. For instance, with native Mobile apps on iOS or Android, this is typically the way they work. In Cognito, the Refresh Token, automatically handled by Amplify, facilitates this. The Id and Access Tokens are both valid for 1 hour, and this is non-configurable. The Refresh Token is valid by default for 30 days. Your app will not require the user to re-authenticate for 30 days. This default can be configured to be as short as one day, or as long as ten years. To facilitate that, Amplify must take advantage of client-side persistent storage, and localStorage is supported by all modern browsers. Using the proper calls to Amplify, the Refresh Token will continue to operate transparently until the time limit is reached, or until the user clears their browser cache.
While localStorage is an improvement on Cookies, it still has some disadvantages. For instance, the user can easily access localStorage through the browser console, and thus can read the information in the JWT Tokens, which are trivial to decode. While there is limited information stored therein, and only that which relates to the user (such as email address), some developers may prefer to store the data in memory, which is somewhat less visible. A drawback is that the tokens then are not persistent across browser sessions.
Another disadvantage of localStorage is that it is not available to Service Workers. IndexedDb, also available on all modern browsers, is a solution for this. Since it is persistent, it behaves like localStorage for the most part, the only practical difference being that the interface to it is asynchronous. Since it is part of the browser itself this distinction does not have much impact.
Cognito provides the ability to designate a custom object to handle storage for your Tokens, instead of using localStorage. We’ve developed custom JavaScript classes to fit the two needs cases above. They are available via the cognito-auth-storage npm package, and cognito-hoc may be configured to use either of them. The cognito-hoc-examples Github repo, which we will discuss below, shows how to do so. The storage classes in cognito-auth-storage can also be used without the HOC if desired.
Tutorial Outline
The steps we will take to walk through our tutorial are:
- Create a new React project (create-react-app)
- Install and setup Amplify
- Create our AWS backend, using Amplify
- Configure our Social Providers (Google in this tutorial)
- Configure our Cognito Hosted UI
- Install cognito-hoc and cognito-hoc-examples
At that point, in cognito-hoc-examples, you will have several working examples of a React App that includes User Authentication (including Social Providers). You will also have the base of a create-react-app project that you can model after any of the AppX.js files in cognito-hoc-examples.
Create a new React project
To begin our tutorial, create a simple ReactJS starter project:
npx create-react-app myproj
And change to that directory:
cd myproj
There is no need to eject during this tutorial.
Before we go further, take a look at the .gitignore file. Note what it looks like, for future reference. Even if you are not using Git, it is helpful to have a look here to get a sense of how AWS positions the Amplify CLI in your toolchain.
Install and Setup Amplify
We will use Amplify’s “Auth” feature to create a very simple Cognito configuration which we will then edit manually to get a clearer sense of what is going on under the hood. Amplify does have components and examples specifically for React, Angular, Vue, and others available online, and some of these are pretty good (some also are dated). We assume you are using the Amplify CLI (which requires command-line access to your AWS account, so please make sure you’ve got that working already). Install Amplify in the folder you built via create-react-app.
Amplify can be installed with yarn or npm in the usual way, such as:
npm install aws-amplify
This will install the entire CLI. Scoped namespaces are available if you want a smaller footprint, but they are not much use as of this writing because aws-amplify-react has a dependency on aws-amplify anyway. On the plus side, the Amplify documentation is pretty clear on the installation process for the different environments. In cognito-hoc we also leverage some of the pre-built components that Amplify provides for React. To install the React-specific package:
npm install aws-amplify-react
At this point we are ready to configure our AWS Cognito backend via Amplify. As mentioned this is a two-step process: first we configure via the CLI, then we “push” to AWS and let it build the backend. The command:
amplify init
Sets up the amplify folder in your project, which provides the backend-to-frontend link for Amplify. Note that it will run some minor stuff in your AWS Account, immediately upon completing the inputs to this command! For the inputs that “amplify init” requests:
- Accept “myproj” for the project name
- For environment, type “dev”
- Choose your editor
- Choose “javascript” for app type
- Choose “react” when asked for the framework you are using
- Keep “src” and “build” for your respective directory paths
- Keep the default npm commands
- Say “no” to AWS profile unless you are experienced in using those
- Enter your Access Key and Secret Access Key
- Pick the AWS region that you wish to use
When you hit <ENTER>, after a moment or two, Amplify will have created some project-related stuff in your AWS Account:
- An S3 Bucket
- A CloudFormation Stack (in the Region you selected)
Don’t mess with the local amplify folder, or with any of the stuff that “amplify init” set up for you in AWS. It’s a lot easier if we let Amplify have control for now. When you want to get rid of the artifacts in your AWS Account, from this same folder you can run “amplify delete.” This gets rid of most of the stuff that amplify init created, but there will probably be some remnants. For instance if we run it right now the S3 bucket would probably still remain, though the rest will be correctly removed. But don’t run it now, we’re continuing with Amplify.
Before we go further, remember we mentioned the .gitignore file above? Have another look in that file, now that “amplify init” is complete. Notice at the bottom, Amplify added a bunch of records for things that it does not want to place under source control. Some are typical (e.g. “build/”) but you will also see several that begin with “amplify” and you may wonder why Amplify stuff should be excluded from source control, especially given that we just entered a bunch of configuration info there that we might want to keep.
Turns out, the way that the Amplify CLI works makes it unhelpful to have that stuff under source control. You can look in the amplify folder to get a sense of what it is doing; in essence it is tracking your settings, and hopefully, keeping the backend in your AWS Account in sync with those settings (every time you run “amplify push”), and also in sync with one further file that you should look at now, which you will find in your project’s “src” folder: aws-exports.js. The aws-exports.js file is the client-side work product that Amplify creates, and you will need to import it into your other *.js files as needed. You will pass its contents to Amplify.configure() in your JavaScript files. Do not change the contents of that file. Let Amplify manage it.
You can see why it is very important not to disturb the “amplify” folder in your project, and also why it’s generally not helpful to put it under source control. Any commit, rollback, or other change that might occur in your source tree could break the link between your amplify folder and the AWS backend that it is managing. Similarly with aws-exports.js.
Now that we have Amplify ready to go, we need to add Capabilities. For our project, we only need one of Amplify’s capabilities:
amplify add auth
When you run this command, Amplify asks for a few parameters. We will keep it very basic:
- Use the Default configuration (we will add Social Providers later)
- We want users to sign in with a Username
- On Signup, we will require an Email (the default)
This command sets up Cognito for us in the local configuration files only. We haven’t pushed it to our backend yet.
Create our AWS Backend – Caution!
We are ready to “push” to AWS, but a word of caution is in order. The Amplify documentation is pretty nonchalant about the push, as it is about the init, but be advised that, since we have just added the “auth” feature, this is going to build several resources in your AWS account (via CloudFormation), and some have potential cost implications. So far, the “amplify init” command built only very benign stuff in our AWS Account. We are now adding only “auth” (Cognito) to that, which has a substantial permanent free-tier. But for instance if your account already has a bunch of stuff in it, you could run into some issues straightaway, such as various hard- or soft-caps if you are already up against things like the CloudFormation stack limit, etc. Also, Amplify has a lot of capabilities besides Auth that you might add. The bottom line is, if you are adding amplify features, you should review your AWS account before-and-after, to get a good sense of what Amplify created, and where any gotchas might be. Now that we are cautioned, go ahead and run the push:
amplify push
Say Yes to the “Are you sure?” question, and that’s it. When the push is completed (it might take a few minutes), you will have an AWS Cognito backend installed in the Region you selected. So that completes the first work product.
We mentioned also the second work product, which is the client-side configuration file, aws-exports.js in your src folder. Have a look at aws-exports.js, but don’t edit it! For now, let Amplify handle any and all edits to your backend. Updates to Amplify will update the src/aws-exports.js file as well.
The Amplify CLI has commands for editing, adding, or removing backend capabilities, and for deleting your entire project when you are done with it, cleaning up (most of) the resources in your AWS account, as we mentioned. If you do want to start a project from scratch and explore more of what Amplify has to offer, the Amplify documentation is pretty good for that, for the various targeted environments.
Examine the New Components in your AWS Account
The User Pool
Before we continue let us examine some of the important components and settings that Amplify has configured for us in our new User Pool and elsewhere in our AWS Account. Log into your account in the AWS console.
Go to the Cognito service and “Manage User Pools,” and click on the User Pool that our “amplify push” command created. The name probably starts with “cognito” and then a hex string and some other stuff (you may have noticed that amplify push displays the prefix at the beginning of its output), ending with your Amplify project name. The left menu will have three broad categories: General settings, App integration, and Federation.
First, examine General settings > Policies. This is where we tell Cognito what password strength to require, and whether or not we wish to allow Users to sign themselves up (some apps may prefer that only Admins can perform User signup). Leave these defaults alone.
Next, examine General settings > App clients, and notice that “amplify push” created two App Clients for us. One is targeted for Mobile apps (iOS and Android), and another for Web clients (it will have the word Web appended to its name). Ignore (or delete) the non-Web one, and click on “Show Details” for the Web client. The “App client id” is important, but we don’t need to concern ourselves with it just yet. Amplify has already put it where it needs to be in our client-side aws-exports.js file. The “App client secret” is empty, and the three empty checkboxes are a good thing; essentially it means we are using the default password handling (SRP). Mixed in between those choices, we can set the Refresh Token’s lifetime. Leave it alone so it will use the default of 30 days. On the client side, Amplify will therefore use the Refresh Token for 30 days to get new Id and Access Tokens as needed, without forcing the user to login again.
Click on all of the “Learn more” links when you have time. Also click on the “Set read and write” link, to get a sense of what fields are available inside the Tokens that get sent to the client. We collect very few of these fields, but if we collected them all, they would all be sent down to the client as claims inside the Tokens. Using the browser console, a user is easily able to read all of this stuff (by copying the token and decoding it), which is not in itself a security breach but we do want to minimize this as much as possible. We are keeping all the OpenID scopes (email, phone, address, and user profile), which is potentially a lot of data.
Amplify Auth also created some other components in our AWS Account which are worth a cursory look, though you can skip these next few sections without a worry.
The Identity Pool
You will notice that in addition to the User Pool, Amplify created an Identity Pool for us. In our project we are going to try to ignore it as much as possible. The reason we do so is to demonstrate what Cognito and Amplify can automate, including Social Provider federation, using just User Pools, and what the tradeoffs are in doing so. The Identity Pool is used primarily to grant access to AWS resources in our AWS Account, and we have no need of this.
IAM
Amplify Auth probably created four (!) IAM Roles in your AWS Account.
- For the User Pool itself:
- myproj-dev-yyyymmddhhmmss-authRole
- myproj-dev-yyyymmddhhmmss-unauthRole
- An SNS Role, so Cognito can send i.e. Confirm Sign Up messages
- A Lambda Role for the Lambda below
- Policies to support these Roles
Lambda
Amplify Auth creates a Lambda function to handle communication between the User Pool and the User Pool App Client. Backend plumbing, do not touch.
CloudFormation
Amplify probably created a master Stack, and a Nested Stack while building your Amplify Auth backend. Leave both alone because this is the primary connection between our amplify folder and our Amplify backend. But I encourage you to look through these (click on them and check out Events, Resources, Outputs, etc.) to get an idea of what “amplify auth” does. It’s a lot.
Examine aws-exports.js in your src folder
Take a look now at the contents of the src/aws-export.js file which amplify created for you. See that AWS has recorded our project’s Region (regionalized AWS components will be instantiated there when we “amplify push”), and our cognito region (which for our purposes is the same value). It also has our User Pool id (aws_user_pools_id, which in the console is Pool Id at the top of our User Pool’s General Settings page), and the App Client Id (aws_user_pools_web_client_id, which in the console is under App Integration > App client settings, under the second App client – the one whose name ends with “Web” – and specifically the Id field right underneath the App Client’s name). Notice that aws-exports.js doesn’t tell us anything about the other App client that it created, because that one is for Mobile apps (iOS or Android) and Amplify knows that aws-exports.js is for a Web app. The “oauth” field also is blank at this point. We will be filling it out manually soon.
Configure our Social Providers
We have not yet set up our Social Providers (Facebook, Google, and “Login with Amazon” are available out of the box). We could have done so during our “amplify add auth” step, but it requires some setup on the Social Provider side first, so we skipped it. But actually there is a more important reason we skipped it at that time: it forces us to do a deeper dive now, which in turn helps us get a grasp of some of the limits of Amplify. Amplify wants to help you do things quickly and automatically, but when configuration becomes slightly more complex, it can be difficult to stay on track without having a deeper understanding of the tools (which ironically is exactly what the tools are trying to help you avoid in the first place).
Let us manually set up Social Login with Google, which is probably a little easier than Facebook because of their slightly different vendor approaches (Amazon is too easy so let’s skip it). Note that once we do this manually, we will break the connection between our Amplify CLI and the AWS backend. Since you are a React programmer, you can think of this step as kind of like a create-react-app eject. No going back.
To setup Google federation in our User Pool, we need a Google App Id, and the App Secret that goes along with it. We need to get this from Google (you need an account with Google of course). Go to the Google Developers Console and choose Credentials from the left nav bar. Select OAuth Client Id from the Create Credentials dropdown, and then choose “Web application.” At this writing, you then need to click two “Create” buttons in a row and then you will be shown your OAuth client ID and client secret. It is these two items which we are after, so we can supply them to Cognito.
Now that we have our info from Google, we can configure our Federation. In the AWS console in our User Pool, go to Federation > Identity providers and click the Google panel. You will see the “Google App Id” and “App Secret” fields. Put Google’s “OAuth client ID” into the former, and the secret into the latter. Also allow all of the indicated scopes: profile, email, and openid (you may have to overtype them yourself to make sure they are recorded).
Also under Federation, make sure our Attribute mapping is set up correctly. This is vital, and easily missed. In our case, we just need to make sure that email and sub are mapped (possibly the Console did it for us automatically). Just make sure that Google’s “email” and “sub” fields (on the left) are mapped to our User Pool’s “Email” and “Username” fields, respectively.
So now we are done with the Federation menu but we still need to tell our App client about it. The App client settings also configure the Hosted UI. If you are not using the Cognito Hosted UI, you don’t need all the settings. But we are going to use it, so before completing our App client settings, we must take a quick detour to the App integration > Domain name settings. Here, we tell Cognito what domain our Hosted UI should use. Either you use an AWS-provided domain (in which case you can type an unused prefix), or if you already have an SSL Certificate issued by ACM, you can use that domain. For this tutorial just pick an unused domain prefix and note the entire domain (up to and including “amazoncognito.com“). That is where your Hosted UI can be accessed.
Head back over to App integration > App client settings, and scroll to the panel whose App name ends in “Web,” because we want to configure our Web App client (as we said, we don’t care about the Mobile App client). In “Enabled Identity Providers” both Cognito User Pool and Google should be checked (the Google checkbox was not there until we set up the Google app in the Federation menu just now. It should be visible now that you’ve set up the Google app).
For both of the Callback URLs, we want http://localhost:3000/ because we are in development, and we assume you are using port 3000 for testing (localhost is the only case where AWS lets you use http. Any other URI requires https). You have probably guessed that these two URLs are required because the Hosted UI uses a different site for Authentication, e.g., one in the amazoncognito.com domain. So when that site has done its work (depending on the Authentication flow that it is processing at the time, such as Sign In, Forgot Password, etc.), it needs to know where to send the result. That is what you are telling it here. (The trailing slash definitely matters!)
Under OAuth 2.0, we want to use the most secure approach, which is Authorization code grant. The Cognito Hosted UI handles this seamlessly for us, without which we would have to implement some minor special handling to support an extra round-trip between our App and the Hosted UI, or, use a slightly less secure approach. Under Allowed OAuth Flows, check that box, and only that box. Under Allowed OAuth Scopes, check them all. We won’t collect much user data (remember we only mapped two fields from Google?) but we don’t want to filter any of it here, though for more advanced usages you might want to.
As of right now, we are pretty much done with the AWS-side setup of our Social Provider federation (with Google), our Hosted UI backend (still need to do the frontend), and our User Pool’s Web App client. Take a breather.
Some Shortcomings of Amplify
We mentioned above that we would look at some of the limitations of Amplify. One of the biggest limitations right now is that there is no “amplify pull” command to complement the “amplify push.” We’ve just now changed several settings via the console, but there is no way to extract them back into src/aws-exports.js, nor into the amplify folder.
This problem is not easily solvable. Recall how Amplify accomplishes the push: it uses CloudFormation to deploy the required resources. CloudFormation is one-way. There is no complementary tool to extract manual stack changes (though curiously AWS can calculate Stack drift). The idea of an “amplify pull” is a pretty natural ask, so just be aware, there is no such tool.
But unfortunately, we couldn’t get everything set up the way we want by using just “amplify auth” in the CLI. We still needed the console to setup our Google secret, etc. The larger AWS CLI has more capabilities, but it knows nothing of src/aws-exports.js or your local amplify folder.
Finalize our aws-exports.js
Luckily, for our project, we won’t need the amplify CLI anymore, so it is now safe to manually edit our src/aws-exports.js. The new contents are:
// WARNING: DO NOT EDIT. This file is automatically generated by AWS Amplify. It will be overwritten.
const awsmobile = {
“aws_project_region”: <Your Region>,
“aws_cognito_identity_pool_id”: “<Your Identity Pool Id>”,
“aws_cognito_region”: <Your Region (same as above)>,
“aws_user_pools_id”: “<Your User Pool Id”,
“aws_user_pools_web_client_id”: “<Your User Pool Web App Client Id>”,
“oauth”: {
“domain”: “<Your Domain>.auth.<Your Region>.amazoncognito.com”,
“scope”: [
“phone”,
“email”,
“openid”,
“profile”,
“aws.cognito.signin.user.admin”
],
“redirectSignIn”: “http://localhost:3000/”,
“redirectSignOut”: “http://localhost:3000/”,
“responseType”: “code”
},
“federationTarget”: “COGNITO_USER_POOLS”
};
export default awsmobile;
The stuff in bold is new. Let us review.
- First of all, yes, we are totally ignoring the WARNING in the comment at the top of the file!
- <Your Region> means, for instance “us-east-1”. Keep all of these in sync for this example.
- <Your Identity Pool> is something we are avoiding, as we said earlier. Amplify creates it though and puts it into aws-exports.js, so we keep it too.
- <Your User Pool Id> and <Your User Pool Web App Client Id> are as we described above. Leave them just as Amplify assigned them.
- The “oauth” section is what we need to change (and also the federationTarget, which probably was not there before). The oauth section sets up our Hosted UI behavior, but it may seem odd that these fields have nothing to do with typical User Interface stuff, but instead with the backend scaffolding. We will address the true UI items in a short while.
- <Your Domain> is the one you selected earlier. AWS doesn’t care what that is, only that it’s unique. In our example above we’ve shown that you’ve chosen to use the hosted domain, but if you had supplied your own ACM Certificate you could use your own Domain.
- We kept both redirects assigned to localhost, for testing our ReactJS app.
- The responseType is “code,” which we set when we selected Auth code grant.
- The federationTarget is COGNITO_USER_POOLS, which means that when Federated Users sign in (in our case, with Google), if they are new users, they will receive a distinct User record in our User Pool, which has their Google Email as one of the attributes.
Notice the warning at the top of this file. Anything you do with the amplify CLI now can overwrite this file! It’s best to just move the entire amplify folder at this point (keep it around, somewhere, because you will probably want to do an “amplify delete” at the end of this tutorial. Before doing so, put it back to where it was and the “amplify delete” should work reasonably well, though as we mentioned earlier it is not 100%).
Go ahead and make your src/aws-exports.js file look exactly like our example above, filling in the bracketed parameters as explained.
Now if we had wanted to do this “the right way,” i.e., during the amplify add auth step, we would simply have selected the “with Social Providers” option instead of the default, and we would have had to answer a few more questions:
- The Domain Prefix we want to use (same as what you entered into the console)
- The redirect signin and signout URIs (http://localhost:3000/)
- The Social Providers we want to configure (Google)
We can see that for this, the amplify CLI leaves something to be desired. For instance, it did ask us what Domain Prefix we want to use, but it didn’t give us the option to use our own domain as the Console does. It also asked us what Social Providers we want to configure, but it didn’t take the actual data from us (i.e., Google’s App Id and App Key). So the amplify command doesn’t help us much with Google configuration, and it doesn’t help us at all if we want to federate with a different SAML or OpenID Connect provider. And when we make those or other changes in the Console, we have no automated way to pass them back to our local project, whose aws-exports.js and amplify folder might then be out of date (depending if we changed things in the console that are also in aws-exports.js).
In short, the automated tool got us part of the way there, but you will almost certainly need to make manual changes. Fortunately AWS is investigating the possibility of creating an “amplify pull” command, but for now there is none. Considering the underlying architecture (CloudFormation), no easy solution suggests itself.
Don’t be discouraged, we are close to the part where AWS Cognito really shines. First, one last bit of configuration: the Hosted UI’s actual User Interface.
Configure our Cognito Hosted UI
When you establish a User Pool (which we did with “amplify push”), Cognito provisions an actual web page to use for your app’s login page. Above we’ve already configured our Domain Name and the other “backend plumbing” of the Hosted UI. At this point, the Hosted UI, in landscape mode (it is nicely Responsive), looks like Figure 1.
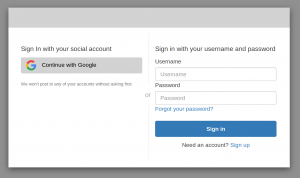
Fig. 1. Default Hosted UI (with grey surround)
We wish to change this look so that it hopefully resembles our branding. For this tutorial, we will try to match the branding of https://www.sdpartners.com
In the AWS Console for our User Pool, select “UI customization” under App Integration. Near the top of that page there should be a link to “Learn more about UI customization” which is worth a read. Note that the content is not 100% complete, but it will give you a very good start.
Underneath that link near the top of the page will be a dropdown entitled “App client to customize.” Click on it, and you will probably see that Amplify, automatically, created the two App clients for our User Pool (you may already have deleted one). The App client whose name ends with “Web” is the one we want to customize, but it’s ok to leave the default of “…all clients…” in this dropdown. That means that any changes we make here (we won’t make any, we will use the CLI instead) apply to all App clients. Note that our User Pool can have any number of App clients, we just have to make sure that our client-side code knows which one to use, which we did in the aws-exports.js file.
The rest of this page has all the options for CSS customization, and frankly, there aren’t enough. But given the benefits of not having to write your own Login page, and especially, of not have to handle any Authentication-related flow whatsoever, including for your Social Providers, this approach can be very much worth it. If you decide later to write a custom Authentication page, you’ll see just how much boiler-plate Authentication work Cognito and Amplify are doing for us. The decision whether to use the customized Hosted UI or write your own fully controllable UI is basically a tug-of-war between the principles of “branding imperatives” and “avoid non-differentiated security code.”
In the Console page, you can drop in a Logo file at the top, and the rest of the panels allow you to set one or a few CSS parameters for several of the elements of the Hosted UI. This connects to the Hosted UI web page via CSS classes, which you can easily Inspect in your browser tools. You will find that the “-customizable” class name suffix corresponds to the various panels in this page, though not all of them are present in the Console, and they don’t always have exactly the same name. Go by what you see when you Inspect in your browser. Only CSS classes that end in “-customizable” are modifiable, and only the few attributes depicted on this screen can be set for those classes. The CLI does a thorough check and throws an error if you try to go outside these pre-established rules.
Instead of using the Console to modify our Hosted UI look&feel, we are going to use the CLI to run the entire command at once. From our command line, we run the AWS CLI command (all one command):
aws cognito-idp set-ui-customization \
--region <Your Region> \
--user-pool-id <Your User Pool Id> \
--client-id <Your User Pool Web App Client Id> \
--image-file <Your Logo File> \
--css ".banner-customizable{ background-color: #426642; padding: 25px 0px 25px 0px;} .background-customizable{ background-color: white; color: black; font-weight: 900;} .idpDescription-customizable{ font-weight: 600;} .textDescription-customizable{ font-weight: 600;} .label-customizable{ font-weight: 300;} .legalText-customizable{ color: black; font-weight: 300;} .submitButton-customizable:hover{ background-color: #324D32; color: white; border-width: 0px;} .submitButton-customizable{ background-color: #426642; color: white; font-weight: 700;"
For <Your Logo File>, a format such as “fileb://./mylogo.jpg” works, at least from Linux (mylogo.jpg is a file in the same folder that we run this command from).
You can see that all we’ve done here is to provide a bunch of CSS (in one big quoted string), instead of going through each Console panel and adjusting the CSS values in each. Also we may have cheated a little bit here; AWS seems to have left out some of the “-customizable” classes from the Console panels, but if you provide them to your —css parameter they will still work. If you try to change anything else, the CLI will complain and throw an Error. Figure 2 shows how our Hosted UI looks after the changes, and additionally we have resized it to show that it is a Responsive design (i.e., it is now one single column, instead of two columns like it is in Figure 1.)

Fig. 2. Customized Hosted UI
Are we happy with the look of this Login page? Does it fit our branding well enough? Well the fact is, the Hosted UI is not quite customizable enough, and unfortunately its pace of improvement on the AWS side is slow. This is by far the biggest drawback of the Cognito Hosted UI, because you may encounter a situation where your branding requirements simply cannot be met. For instance, on this screen, we’ve intentionally chosen to leave the Google and Facebook buttons as-is. We don’t customize them in any way, because actually we do want the user to understand visually that the Social Provider is truly controlling the Authentication. You can customize the buttons including the hover color, but it may be more trouble than its worth. In our case we don’t want to do that anyway. Your branding managers may disagree.
Also, you can’t customize the layout. You are pretty much stuck with the “Sign in with Social Or Sign In With User / Password” layout. What’s worse, you can’t change the styling of the “Sign Up” link (though you can for the “Forgot Password” link). This seems like a simple oversight and I’ve filed a request with AWS for this, but I question when or if they will get to it. Meanwhile, suppose for branding purposes that you need to change the background color of the Login screen. It had better have good contrast with the color of the “Sign Up” link. Also if you want to enlarge the font for that link, you cannot. Your branding managers may not be happy.
Another issue is that you cannot provide a “Show Me” button for the Password box. If the user wants to see what they are typing there, as people often do, they are out of luck.
These seem to be the most important restrictions of the Hosted UI. Unfortunately since they impact branding, some shops may not be able to live with the restrictions, in which case the only alternative is a custom UI. The custom UI can still leverage the Amplify SDK under the hood, but it requires many, many lines of code to handle all of the typical Authentication flows. And it’s easy to make a mistake. ReactJS expertise and OAuth/OIDC security expertise are not super-common overlapping skills.
So Why Use Cognito and Amplify?
Given these restrictions, plus the difficulties we discussed earlier with Amplify, why bother to use Amplify or the Hosted UI? Well actually, there are a ton of reasons. Among these:
- Sign Up flow handled automatically (and also Confirm Sign Up, including MFA if you desire)
- Forgot Password flow handled automatically
- Password format validation handled automatically (based on our User Pool settings)
- Auth Code Grant handled automatically (most secure approach). This requires extra round trips to the Auth server, which we don’t need to concern ourselves with if we go with the Hosted UI.
- Refresh Token operates automatically (really an Amplify feature)
- All this can apply to Social Providers as well
- Social Provider gets a “ghost user” in the User Pool, i.e., this user is automatically a first-class user. (Some will see this as a drawback, i.e. when having to delete users, but the automatic provisioning of a record has some advantages too)
- Cognito provides an OIDC Id Token and an OAuth2 Access Token (plus the Refresh Token) when the User logs in
- The Hosted UI has reasonable, automatic error messaging when a user enters the wrong password, a new user tries a non-conforming password, etc.
- Another screen you don’t need to build / host / maintain
This is not an exhaustive list, but already it covers many important items. Since we’ve done all the hard stuff up front, we write almost no code to handle any of these concerns. If your branding people can live with the look and feel, it is a pretty compelling approach. All that our ReactJS App needs to do going forward is to keep track of the Logged-in state of the User so we know when to redirect to the Login screen.
This is what Cognito HOC does.
Install cognito-hoc and cognito-hoc-examples
The cognito-hoc npm package is a ReactJS Higher Order Component, which can be used to wrap a ReactJS <App> with Cognito and Amplify Authentication. The App will be given a prop, userIsLoggedIn, which is either ‘true’ or ‘false’ (a string). If ‘true,’ the App should render Authenticated content (i.e., whatever protected content is behind the Login page). If not ‘true’ the App should only render “public” content. You can of course pass this prop down through your Component hierarchy to render or not render protected Components and data in portions of your UI.
Install the package directly into our project:
cd myproj
npm i cognito-hoc
This also installs cognito-auth-storage, which cognito-hoc has a dependency on. You can use cognito-auth-storage independently if you only want access to the Amplify Auth storage classes therein. See the README of cognito-auth-storage for more information.
As discussed at length above, to use cognito-hoc you need a fully configured backend in AWS Cognito. You will also need the aws-exports.js file that it creates.
The two broad configurations of cognito-hoc are “button,” for Apps with secured and non-secured content, and “timer” for Apps which have only secured content. See the package’s README for more information, as well as for information on using the different storage classes including those in cognito-auth-storage.
Finally, there is a cognito-hoc-examples Github repo which has several different example Apps, demonstrating all of the possible configurations of the HOC, starting from create-react-app (no eject required). This one should not be installed in our ReactJS project folder. Put it at the same level as myproj, as a totally separate project, via git clone. The full instructions are in the repo’s README.
Just as we would want to do in our myproj project, the aws-exports.js file should be installed into the src/config folder of the cognito-hoc-examples folder to get the examples to work. After that, “npm run start1” etc. to run through the examples in your browser.
The several “AppX.js” files in cognito-hoc-examples show how we should implement our own App.js in myproj, to leverage cognito-hoc and aws-exports.js in our own app. Feel free to leverage them in your own projects.
When using the cognito-hoc-examples, the *PlainStorage.js examples use localStorage. Use your Browser’s DevTools to confirm that the Cognito Tokens are being placed there when logging in, and removed when logging out. The *IDBStorage.js examples use IndexedDB instead, which you can also check with DevTools. Finally, the *MemoryStorage.js examples use a simple JSON object.
A final note, or admission, that it is expected that you will notice some “flashing” and minor (sub-second) latency of the interface when you Sign In or Sign Out. It’s nothing you’ve done wrong. This is a result of relying on the Amplify Hub feature, which does not synchronously know when the User has changed their Login state. We have purposely not built any more intricate UI logic, in hopes that it would be easier to grasp the basics of how Amplify and the Hosted UI work in both the “Button” and the “Timer” configuration. Depending on your UI needs, it’s easy to add a little more state to get more fine-grained control over the UI’s transitory behavior. Feel free to do so. All of the source is openly available on GitHub.


Thanks for this article, good walkthrough of how to set it up. Also the hoc is useful and simple to use
thanks for this it works
~ v